Hello Folks, I’m hoping you’re not having a good day because you’ve just encountered what we call as the Blue Screen of Death 🙁 Are you searching for solutions all over the Internet? Then I hope your search ends here. You’re computer’s screen all blue. You keep restarting your PC but everytime you see the Blue Screen of Death. You might even hit your cabinet hard; hoping your computer starts but it doesn’t. You blame your luck for this situation and just can’t complete your work at hand.
If you’re a kid, then the situation can be even worse for you. You’re scared because your father might scold you. You’re afraid because he’ll blame your games for this Blue Screen of Death to occur. He might even stop you from playing games forever (actually he won’t).Well right now I can understand you. I can understand your condition (it happens with every Windows User). Now if you call a friend and ask him what to do? He’ll probably say to format your PC; which is not a feasible idea (Yeah! It isn’t).
But don’t worry I’m your friend too.I’ve got this very easy and compressive guide to help you fix your Blue Screen of Death error in just a matter of minutes.
Disclaimer: Before writing this guide I searched the Internet for similar kind of articles out there. Most of them were useful but could be a lot confusing for any normal user. So this guide removes all the complicated stuff and gets down to only what important and easy.
Now before we get to actual steps. Let me answer this important question.
Why does the Blue Screen of Death error occurs?
Blue Screen of Death is usually a stop error. Its your computer’s (mainly Windows) way of saying, “There a major problem inside your system. To avoid further damage, the computer has been stopped from booting.”
Blue Screen of Death can occur due to following reasons:
- Memory (RAM) issues.
- Hard Disk boot sector errors.
- Installation of new unsupported hardware or drivers.
- Problems occurring due to deadly behavior of viruses
But don’t worry; just take a deep breathe and we’ll easily get your problem solved step by step in minutes (Yeah! I mean it).
Step I – Simply Restart!
Now most of the times Blue Screen of Death error can occur suddenly. Doing normal stuff like listening music, playing games or even surfing the Internet; the Blue Screen of Death error can occur anytime. Even Bill Gates suffered from Blue Screen of Death error during demonstration of Windows 98.
Well if you still have some humor left. Here’s an image gallery of 50+ Blue Screen of Death blunders.
Now in such situation what you do is restart the computer. Only to find the error never occurring again. For most people a simple reboot will do the work. No skills required. Problem solved.
Must Read: How to Easily Remove ‘Disk is Write Protected’ Error
Step II – Remove any newly installed hardware
Even installing a new hardware can cause instability in your system. So its wise to remove any newly installed hardware and restart your computer. Most of this time the hardware can be a RAM or Hard Disk Drive.
In such cases you can ask a friend for a supporting Hard Disk or RAM. If the computer starts then the culprit can be your newly bought hardware. (Possibilities of such occurrence is very low)
But still before you go to the shop and complain. Do try the below steps too.
Step III – Enter Safe Mode
Safe Mode is your go-to option when dealing with Blue Screen of Death.
To enter Safe Mode, Power your computer and at boot, start tapping ‘F8′ button continuously until you get the Advanced Boot Options.
Inside Advanced Boot Options, you’ll see a lot of different options. Don’t sweat because understanding these options is as simple as tearing a packet of Wafers.
Using your keyboard keys, move to Safe Mode with Networking and hit Enter. You’ll see a screen like one below and in some seconds you will enter your desktop screen.
For non-techy user here’s a video guide to opening Safe Mode with Networking. (Skip if you already did)
For techy users; here’s a comprehensive list of Blue Screen of Death Stop Errors to find the exact cause.
Step IV – Check for Conflicting Drivers
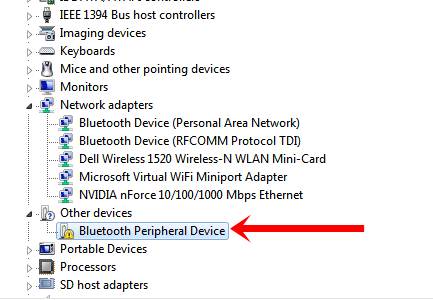
Inside Safe Mode, the first thing we’ll do is check for Conflicting Drivers.
Go to Control Panel -> System -> Device Manager.
Expand each and every device category and check for conflicting drivers. A conflicting driver usually has a yellow error mark next to its icon as shown in image below.
Right-click on the conflicting driver and Uninstall it. Uninstalling conflicting drivers does help to take away the Blue Screen of Death Error.
Must Read: Top 5 Computer Pranks Everyone Must Know About
Also visit: Run 3 Unblocked and Raze 3 Unblocked
Step V – Run an Antivirus Scan
For most PCs, Viruses are the main cause for occurrence of Blue Screen of Death Error. I strongly recommend you use retail (paid) version of Antivirus Software.
If you have an antivirus installed, scan the entire computer. Your antivirus will heal or remove most of the viruses, worms and Trojans.
But sometimes your paid antivirus is able to detect a virus; but is not able to remove it. In such scenario manually go to the path as shown in the antivirus software and delete the file manually.
I personally recommend to use paid AV from Kaspersky, Quick Heal and Norton only. Suppose in your condition you don’t have any paid antivirus installed. I suggest you download and scan your PC using these three software together – Microsoft Security Essentials, AVG Free Antivirus and Malwarebytes AV (Strongly Recommended).
Step VI – Do a registry Scan
This section isn’t as important as other sections. But to get away with Blue Screen of Death Error; I do insist you do a registry scan using software like CCleaner.
CCleaner has Registry Cleaner Option too. Look at no other software other than everyone’s favorite CCleaner.
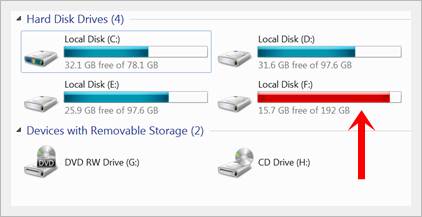
Step VII – Free Up Some Disk Space
To avoid Blue Screen of Death Error its very important to keep your disk partitions nearly 25% free. Microsoft recommends to keep at least 100MB free disk space. But I recommend you keep at least 10-25% disk space free.
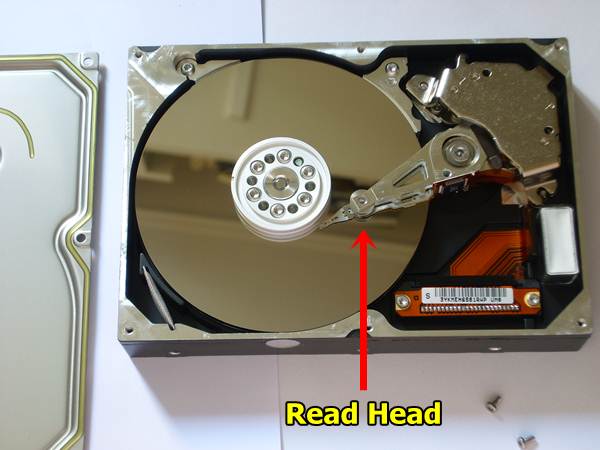
Filled up hard drives causes paging problems in your system. Now to tell you little basics of hard drives. Data is stored in your hard disk in sectors.
Your hard disk contains a read head (shown in picture) which reads data from these sectors. Now when you entirely fill a hard disk; this read head jumps from sector to sector.
This jumping of read head from sector to sector reduces efficiency. It causes wear and tear of the hard disk too. This might result in boot failure of hard disk and does causes Blue Screen of Death Error.
Must Read: How to Change your Processor Name
Step VIII – Restore your System
While solving Blue Screen of Death Error. People directly jump to System Restore Option. I oppose it to be the second last step to solve Blue Screen of Death Error.
Now what System Restore does is; it configures your system to previous perfectly running configuration. In simple words it takes your system back in time where it was running all fine and good.
Now suppose 3 days ago your system is running perfectly fine; and today you faced the Blue Screen of Death. Using System Restore your system will restore the settings it had 3 days ago.
One main problem associated with System Restore is. Consider you downloaded an important document and then your computer shows Blue Screen of Death. You System Restore your PC 3 days back.
Now inside your Downloads folder you won’t find that downloaded document. Because System Restore deletes all files added to the PC between these 3 days.
Here’s an amazing video guide from YouTube User TheTechScore which shows how to do a system restore using safe mode.
Step XI – Format your Hard Disk
Well if no 8 steps shown above work to solve Blue Screen of Death Error. The only thing you can do is format your hard disk. This will surely remove your Blue Screen of Death Error.
Being a computer technician I know it feels bad to format a hard disk. You lose all your installed software and download files too.
If you really want to format your PC and you use Windows 7. Here’s a simple guide to Create a Windows 7 bootable USB in just under 9 Minutes.
Below I’ve embedded an amazing video from AvoidErrors which shows the complete process to format a PC using Windows 7.
Well if you finally made it till here. Let me tell you I’ve tried to make this guide as easy as possible for even a normal user to understand. Do show us some love.
Please do not forget to share this video on social media sites like Facebook, Google+ and Twitter with the button shown below and help your friends too. If you have any kind of problems or face even simple errors; do not hesitate to ask me in the comments section. Because I love to hear from my users.
Have a great day!
Read More:
- Top Five Best Smartphones Under Rs. 20,000 Rupees in 2014
- Back in Time: Nokia’s 21 Most Iconic Phones that Attained Cult Status
- Top Five Smartphones Under Rs. 10,000
- Revealed: The Secret to Making $280 Per Month from Kingged.com